
When a process line drifts or an alarm trips, fast and accurate methods for pressure sensor troubleshooting keep production moving and protect your equipment. Maintenance technicians and field engineers keep meeting the same recurring failures: a transmitter that shows no output, a signal that jumps erratically, or a reading that has quietly drifted away from zero. This guide walks through each failure mode with practical, field-ready diagnostics you can run with a digital multimeter (DMM) and basic hand tools.
Start With a Systematic Pressure Sensor Troubleshooting Approach
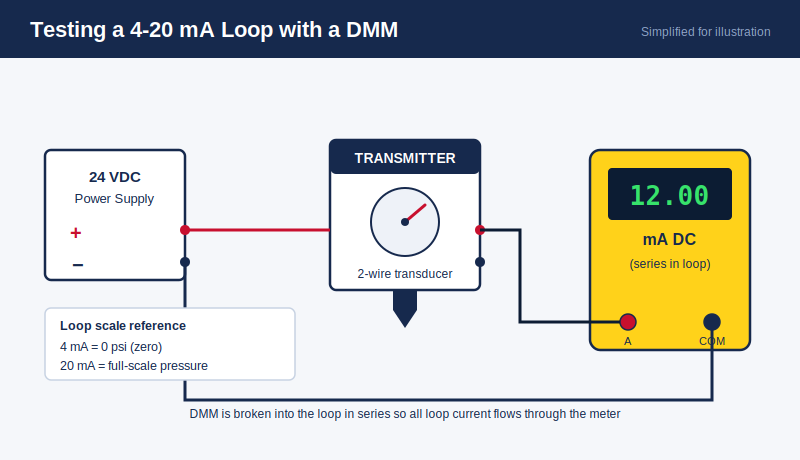
Before swapping hardware, confirm the fundamentals. When your pressure sensor requires troubleshooting, a transducer converts applied pressure into an electrical signal, and most industrial units output either a 4-20 mA current loop (a two-wire signal where 4 mA equals zero pressure and 20 mA equals full scale) or a 0-10 V voltage signal. Knowing your output type determines every test that follows.
- Record the sensor model, output type, and rated range from the nameplate or datasheet.
- Verify the supply voltage at the transmitter terminals matches the specification, commonly 24 VDC.
- Confirm the loop or signal wiring is landed on the correct terminals.
- Keep the datasheet handy so you can compare live readings against rated values.
No Output: Power, Wiring, and Open Circuits
A no-output condition means the sensor produces no signal at all, a flat 0 mA or 0 V at the controller. In practice, this is one of the most common problems encountered when pressure sensor troubleshooting is required, as it almost always points to a power or continuity problem rather than a failed sensing element.
- Measure supply voltage directly at the sensor terminals with your DMM set to VDC. A reading well below spec indicates a power supply fault or a voltage drop across a long cable run.
- Set your DMM to mA DC and break into the loop in series to read loop current. A steady 0 mA confirms an open circuit, while a value pinned at or above 20 mA suggests a short.
- Inspect wiring for open circuits, meaning a break in the conductor that stops current flow. Look for cut wires, backed-out terminals, and corroded ferrules.
- Confirm polarity on two-wire transmitters, since reversed leads produce no output.
- Bypass the field wiring by powering the sensor at a test bench to isolate the fault to the device or the cable.
Solid pressure sensor troubleshooting here isolates whether the fault sits upstream in the power and wiring or inside the sensor itself.
Erratic Readings: Noise, Grounding, and Loose Connections
Erratic readings are unstable values that jump or flutter without a real process change. The typical pressure sensor troubleshooting path here involves checking for electrical noise (unwanted interference coupled from nearby motors, variable frequency drives, or power cables), poor grounding, and intermittent connections.
- Route signal cable away from power conductors and drives, and use shielded, twisted-pair cable to reject noise.
- Ground the cable shield at one end only. A ground loop, which is current flowing between two grounds sitting at slightly different potentials, can inject noise when both ends are bonded.
- Torque every terminal and inspect connectors for loose connections, which create intermittent spikes as vibration makes and breaks contact.
- Watch for voltage spikes from switching loads. A snubber or surge suppressor can help absorb these transients.
- Confirm a clean, low-impedance ground reference at both the sensor and the controller.
Consistent application of pressure sensor troubleshooting for noise pays off quickly, because a stable ground and proper shielding resolve the majority of flickering-signal complaints.
Zero Shift: Overpressure, Temperature, and Mounting Stress
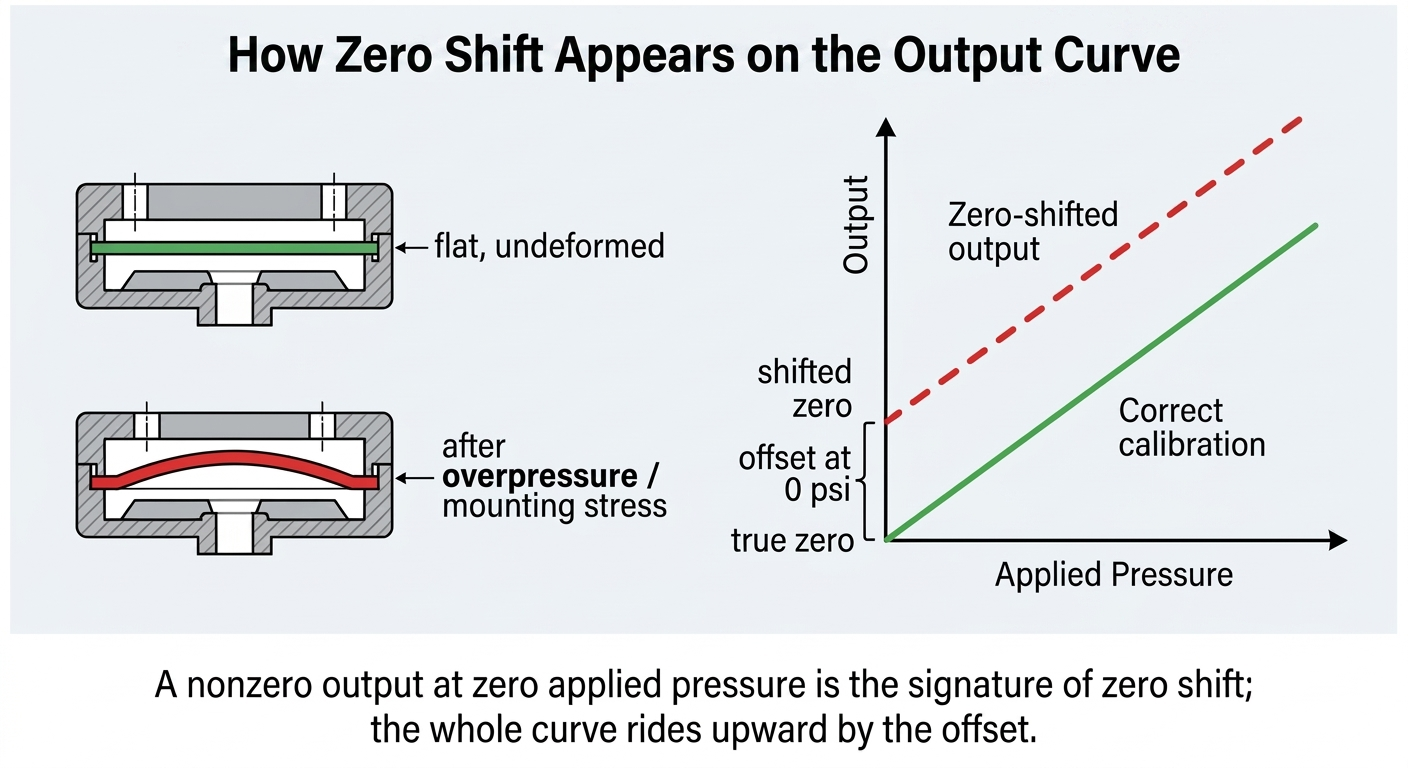
Zero shift is when the sensor reads a nonzero value at zero applied pressure, meaning the baseline has moved. To address zero drift effectively, a detailed pressure sensor troubleshooting plan is necessary because causes are usually mechanical or thermal rather than electrical.
- Vent the sensor to atmosphere and check the reading. On a gauge sensor it should read zero, so a persistent offset confirms zero shift.
- Review process history for overpressure events. Overpressure, meaning pressure beyond the rated limit, can permanently deform the sensing diaphragm.
- Check the operating temperature against the rated compensated range, since thermal expansion can move the baseline. Allow the sensor to reach thermal equilibrium before judging the result.
- Inspect the mounting for stress. Overtightening or misaligned fittings transmit mechanical strain into the sensor body, which shows up as zero shift.
- Re-zero or recalibrate against a known reference if the offset is within adjustable limits, and replace the unit if the diaphragm is damaged.
For calibration references and measurement best practices, consult the calibration procedures published by NIST.
Pressure Sensor Troubleshooting Best Practices
- Document every reading so you can trend drift over time. In addition, structured pressure sensor troubleshooting makes reporting repeatable and helps you track changes efficiently.
- Keep a known-good unit on hand for quick swap testing.
- Standardize on quality industrial pressure transducers to reduce failure rates at the source.
Many field problems trace back to the operating environment. Ruggedly engineered Phoenix Sensors transducers are built with robust temperature compensation, sealed enclosures, and strong EMI shielding, which natively prevents environment-driven issues like zero shift and noise susceptibility before they ever reach your control system. This is why regular pressure sensor troubleshooting is a valuable maintenance protocol.
Conclusion: Get the Right Sensor and Support
Methodical pressure sensor troubleshooting turns a stalled line into a quick, confident repair. Work from power to signal to sensing element, define what each symptom is telling you, and verify with a DMM at every step.
Need a sensor matched to a harsh environment, or hands-on help diagnosing a stubborn fault? Contact the Phoenix Sensors team for custom sensor integration and technical support. Dependable solutions for pressure sensor troubleshooting start with the right hardware and the right partner.